
TL;DR:
- Shelter dogs require a gradual 10-14 day diet transition due to stress and unknown feeding history.
- Monitoring stool, energy, and appetite daily guides safe dietary adjustments during recovery.
- Vet-approved, balanced natural diets improve long-term health, coat, and digestion in rescue dogs.
Bringing a shelter dog home is one of the most rewarding things you can do, but it comes with a real nutritional challenge that most adoption guides gloss over. Shelter dogs often arrive stressed, with unknown food histories and digestive systems already under pressure. Switching them too fast to a new natural diet can trigger vomiting, diarrhea, and serious setbacks. The good news is that a gradual 7-14 day transition gives their bodies the time to adjust safely, and when done right, the health rewards are absolutely worth the patience.
Table of Contents
- What to know before switching: Understanding shelter dog needs
- Gather your supplies: What you need to get started
- Step-by-step: How to transition your shelter dog safely
- Monitoring and troubleshooting: Spotting and solving common issues
- Measuring success: Signs of a healthy transition
- What most guides miss about transitioning shelter dogs to natural diets
- Ready to make the switch? Get safe, premium nutrition for your dog
- Frequently asked questions
Key Takeaways
| Point | Details |
|---|---|
| Go slow and steady | Transition shelter dogs to natural diets gradually over 10–14 days for best results. |
| Watch for warning signs | Monitor appetite, stool, and energy for any issues and adjust pace as needed. |
| Vet guidance matters | Always use a vet-approved natural diet plan to ensure safety and balanced nutrition. |
| Supplies set you up | Gather commercial or balanced homemade food, a scale, and tracking tools before starting. |
| Success is visible | Improved energy, coat, and digestion are signs of a healthy transition. |
What to know before switching: Understanding shelter dog needs
Now that you understand the risks and potential, let’s dig into the unique needs of shelter dogs before transitioning their diets.
Shelter dogs are not like typical dogs getting a routine food upgrade. They carry a lot of invisible baggage, and that baggage directly affects how their digestive systems handle change. Stress alone can cause loose stools and reduced appetite, even before you introduce a single new ingredient. Add an unknown food history into the mix, and you have a situation that requires real care and patience.
Before you open a bag of premium natural food, gather as much information as possible from the shelter. Ask what brand they were feeding, how often, and how much. Even if the shelter diet was low quality, knowing what your dog is used to gives you a critical starting point. According to safe adoption diet transition guidance, you should extend the transition timeline to 10-14 days for rescue dogs specifically because of stress and potential sensitivities that are not present in dogs with stable histories.
Some key considerations unique to shelter dogs include:
- Unknown ingredient sensitivities that may not show up immediately
- Possible parasites or underlying gut issues that make digestion fragile
- Anxiety and stress responses that directly worsen digestive function
- Irregular feeding schedules at the shelter that affect appetite patterns
- Potential malnourishment that requires a slower, gentler reintroduction of richer food
Pay close attention to your dog when you get home. Learning how to transition dogs with sensitive stomachs is especially valuable here, because many shelter dogs present with gut sensitivity in the first weeks. Watch for changes in stool consistency, energy level, and appetite every single day. These three signals will guide every decision you make throughout the transition.
“Shelter and rescue dogs with unknown histories need extra care during diet transitions. Monitor stool, appetite, and energy closely, and give yourself more time than you think you need.” This mindset, not the food itself, is what makes or breaks a successful switch.
Gather your supplies: What you need to get started
Before starting the food swap, gather what you need and decide which type of natural diet works best for your new companion.
Going in unprepared is where most well-meaning owners stumble. Transitioning to a natural diet is not complicated, but it does require a few key tools and a clear plan before you begin. Here’s what you’ll need on hand before day one:
- Your dog’s current shelter food (or the closest equivalent you can source)
- Your chosen natural food (freeze-dried, gently cooked, or whole ingredient commercial)
- A food scale to measure accurate portions, not just eyeball estimates
- A transition journal to log daily meals, stool quality, energy, and appetite
- Plain canned pumpkin (not pie filling) as a gentle digestive buffer if needed
- Your vet’s contact information readily accessible
Choosing the right type of natural food matters as much as the transition process itself. Here’s a simple comparison to help you decide:
| Food type | Pros | Cons | Best for |
|---|---|---|---|
| Freeze-dried | Nutrient-dense, minimal processing, long shelf life | Higher cost | Dogs needing easy digestion and maximum nutrition |
| Gently cooked | Palatable, easy to portion | Requires refrigeration | Picky eaters or dogs with texture sensitivities |
| Raw | Excellent coat and stool benefits reported | Requires careful handling, vet approval essential | Experienced owners with vet guidance |
| DIY whole ingredient | Customizable | Risk of nutritional imbalance without expert input | Only with a veterinary nutritionist on board |
The evidence around vet-approved diet choices is clear: natural diets improve stool quality, energy, and coat condition for many dogs. However, raw diet safety is a real concern, and the American Veterinary Medical Association (AVMA) specifically cautions against raw diets due to pathogen risks. Whatever you choose, make sure it is properly formulated to meet AAFCO (Association of American Feed Control Officials) standards for complete and balanced nutrition.
Pro Tip: If you are unsure which natural diet to start with, freeze-dried commercial food from a reputable brand is the safest first option. It combines minimal processing with balanced formulation and does not require the precise handling that raw food demands.
You can also explore balanced meal plans for shelter dogs to get a clearer picture of what a complete, species-appropriate diet looks like for your specific dog’s size and age.
Step-by-step: How to transition your shelter dog safely
With your supplies ready, here’s exactly how to make the switch, days 1 through 14 and beyond.
The single most important principle here is patience. According to AKC nutrition guidance, transitioning over 7-14 days starting at a 75% old food and 25% new food ratio prevents the digestive upset that comes from sudden change. For shelter dogs, lean toward the longer end of that range or extend it further if needed.
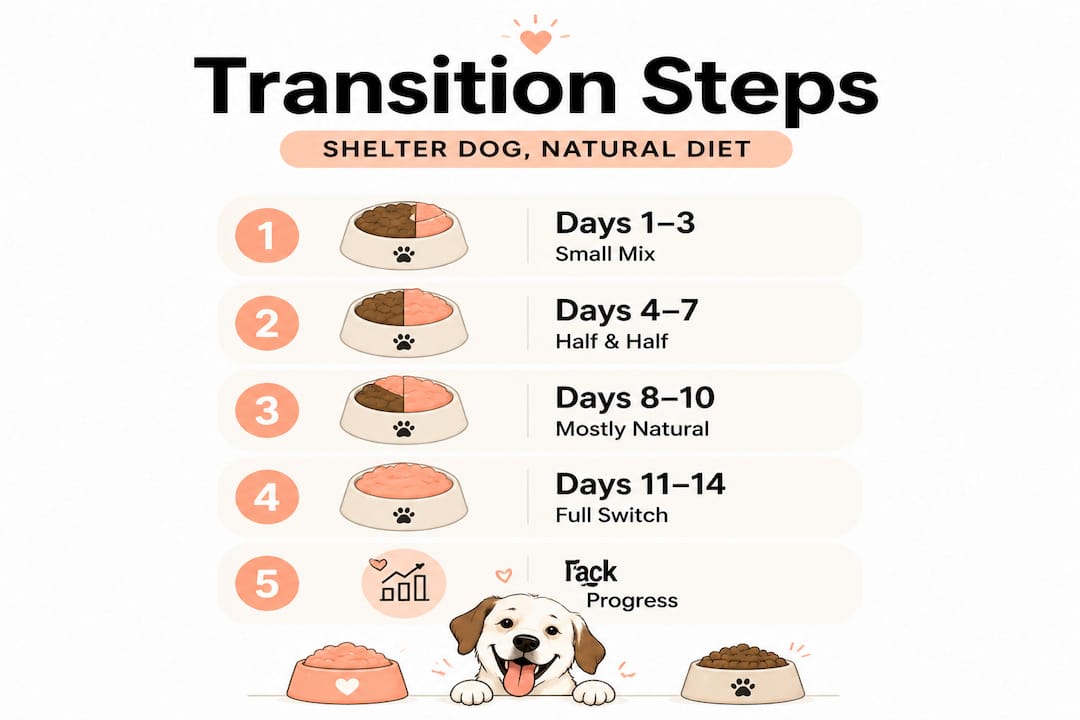
Here is a practical day-by-day schedule to follow:
- Days 1 to 3: Feed 75% old food, 25% new natural food. Watch closely for any changes in stool, energy, or appetite.
- Days 4 to 6: Move to 50% old food, 50% new food. This is often where mild loose stool can appear. Slow down if it does.
- Days 7 to 9: Shift to 25% old food, 75% new food. Your dog should be adjusting well by now if the earlier stages went smoothly.
- Days 10 to 14: Transition fully to 100% new natural food. Continue monitoring daily even after the switch is complete.
- Day 14 and beyond: Log a weekly check-in for stool, coat, weight, and energy for the first two months.
| Transition phase | Old food | New food | Watch for |
|---|---|---|---|
| Days 1 to 3 | 75% | 25% | Stool changes, appetite dips |
| Days 4 to 6 | 50% | 50% | Mild loose stool, energy shifts |
| Days 7 to 9 | 25% | 75% | Improved stool, growing interest in new food |
| Days 10 to 14 | 0% | 100% | Full adjustment, stable digestion |
For dogs who are visibly underweight or emaciated, this standard schedule does not apply. The ASPCA guidelines on refeeding emaciated dogs are clear: start at one-third of the dog’s Resting Energy Requirement (RER) on day one, move to two-thirds on day two, and reach full RER by day three or beyond. They also recommend supplementing thiamine and cobalamin (B vitamins) to prevent refeeding syndrome, a dangerous condition where rapid nutritional reintroduction causes electrolyte shifts.
Critical reminder: Rushing this process is never worth it. A dog that experiences serious digestive distress during transition may develop a lasting aversion to the new food, setting back your efforts by weeks.
Our 7-10 day transition guide walks you through this schedule in even more detail, including specific portion sizes for different dog weights. And if you’re moving to a freeze-dried format specifically, learning how to transition to freeze-dried food as a standalone step can make the whole process smoother.
Pro Tip: Keep a simple notebook or phone note with the date, ratio used, stool score (1 for loose, 5 for firm), and any behavioral changes. This makes vet conversations much more productive if issues arise.
Monitoring and troubleshooting: Spotting and solving common issues
Even with the best plan, some hiccups can happen. Here’s how to address them quickly and effectively.
Digestive reactions during a food transition are normal in small amounts. The question is how to tell the difference between a minor adjustment and a real problem. Here’s what to watch for:
- Loose stool or diarrhea for more than 48 hours at any single ratio stage
- Vomiting more than once or twice during the transition period
- Refusing meals more than one feeding in a row
- Lethargy or listlessness that is noticeably different from baseline energy levels
- Blood in stool at any point, which is always a reason to call your vet immediately
If you notice any of these signs, the first response is simple: slow down. Revert to the previous ratio that your dog tolerated well and hold that ratio for an additional three to four days before trying to advance again. For dogs with more complex sensitivities, you may benefit from reading our guidance on dogs with sensitive stomachs to understand whether food sensitivities or something else is driving the reaction.
The safe diet switch guidance for rescue dogs specifically recommends having a vet involved throughout this process, not just at the start. Your vet can rule out parasites, infections, or other underlying conditions that mimic food intolerance symptoms. In shelter dogs especially, these issues can easily be confused with each other.
When to call your vet: Persistent vomiting, blood in stool, extreme lethargy, significant weight loss, or signs of pain when eating are all reasons to pause the transition and seek professional input right away.
Investing in better nutrition now can also help you reduce vet visits over time, since a stable, high-quality diet directly supports immune function, gut health, and overall resilience.
Pro Tip: Bring your transition journal to every vet appointment during the first three months. Specific dates, ratios, and stool changes help your vet make faster, more accurate assessments.
Measuring success: Signs of a healthy transition
Finally, let’s look at the rewards of all your patience and effort: a healthier, happier dog.
By weeks two through four, you should start seeing real, tangible changes in your dog. These are the signals that tell you the transition worked and that the natural diet is doing exactly what it should. Research shows that dogs on natural diets often see improvements in stool quality, coat condition, and energy, though always with proper formulation and vet oversight in place.
Here are the positive milestones to celebrate and track:
- Firmer, smaller, and less odorous stools within the first two to three weeks
- Shinier coat and reduced shedding typically visible by weeks three to six
- Higher energy and playfulness as nutrient absorption improves
- Healthier appetite with genuine enthusiasm for mealtime
- Stable weight gain in previously underweight dogs
| Milestone | Typical timeline | What it signals |
|---|---|---|
| Firmer stool | Days 7 to 14 | Gut is adjusting well to new food |
| Improved coat sheen | Weeks 3 to 6 | Better fat and protein absorption |
| Higher energy levels | Weeks 2 to 4 | Improved caloric and nutrient availability |
| Enthusiastic eating | Week 1 to 2 | Food palatability and palatability match |
| Stable healthy weight | Weeks 4 to 8 | Balanced caloric intake and digestion |
Continue logging weekly check-ins even after the transition is complete. Maintaining open communication with your vet ensures that if anything changes, you catch it early and adjust before it becomes a bigger issue.
What most guides miss about transitioning shelter dogs to natural diets
Now that you know what success looks like, consider these real-world lessons most articles overlook.
Most transition guides treat all dogs the same. They give you a seven-day schedule, a ratio chart, and a list of approved ingredients, and then they call it done. What they miss is that shelter dogs are an entirely different category, and the standard timeline is often too aggressive for them.
We have seen cases where an owner followed a perfectly designed seven-day plan, hit day five, and their dog regressed significantly because the stress of a new home combined with the new food was simply too much at once. Slowing down to a 21-day transition using smaller ratio increments of roughly 10% every two days made all the difference. No vet visit needed, no dramatic upset, just steady progress.
The other thing most guides underestimate is the danger of unbalanced DIY natural diets. Owners read that whole foods are better and start assembling homemade meals without understanding that dogs need specific calcium-to-phosphorus ratios, adequate vitamin D, and precise omega fatty acid balances. A well-meaning homemade diet built from chicken, rice, and vegetables without proper formulation can lead to bone density loss and deficiencies within months.
According to rescue diet transition best practices, vet consultation and vet-approved transitions are not optional extras for shelter dogs. They are foundational to safe, lasting results. Natural is not automatically safe, and slow is not a weakness. It is the most effective strategy you have.
Ready to make the switch? Get safe, premium nutrition for your dog
If you’ve made it this far, you’re exactly the kind of thoughtful dog parent your shelter dog is lucky to have. Starting a natural diet transition is one of the best investments you can make in your dog’s long-term health, energy, and happiness.
At Loyal Saints Pets, we’ve built every product with shelter and rescue dogs in mind, using human-grade, whole ingredients and zero fillers or additives. Our freeze-dried formulas meet AAFCO standards and are veterinarian approved, giving you the peace of mind that comes from knowing your dog is getting genuinely balanced nutrition. You can learn about freeze-dried options to understand why minimal processing preserves more of the nutrition your dog actually needs, or head straight to our natural dog food shop to find the right fit for your dog’s size, age, and needs. More tail wags are coming.
Frequently asked questions
How long should I take to transition a shelter dog to a new diet?
Most shelter dogs need 10-14 days or longer for a safe gradual switch, especially given the stress and unknown dietary history common in rescue situations.
What signs show my shelter dog isn’t adjusting well to the new food?
Watch for vomiting, diarrhea, refusing food, or decreased energy, and slow or pause the transition by reverting to the last tolerated ratio if these occur.
Can I transition my shelter dog to a raw or homemade natural diet?
Raw or homemade diets can benefit your dog if properly balanced and vet-approved, but unverified DIY formulations carry real risks of nutritional deficiency and pathogen exposure.
What is the safest way to transition an emaciated shelter dog?
Follow the refeeding protocol that starts at one-third of the dog’s Resting Energy Requirement and increases over several days, with thiamine and cobalamin supplementation to prevent refeeding syndrome.


